Monday, October 3, 2011

Oktober Blog-Fest

Been a really long time since the last post. So here is a quick view of the things I've been doing in that really long time ago....


A new track on FL Studio Niner.


Some experimentation with camera stabilization in After Effects


Some more productions in FL. Yeah its been 'em busy weekends.


And one orchestral cue 


Until next time. Oh and one last thing - That FumeFX SIM tab is just about ready.... (like someone gives a damn)


Wednesday, August 31, 2011

Fume FX - The General Tab

Hey there visitor, wassup. This is a brief basic description of the general properties tab of Fume FX. I could not find any text based description of Fume FX on the internet so here is one. All the other tabs will be documented here in subsequent posts once every week as i go through all of them one flame at a time. So be sure to return and check em' out. This will also act as an online documention so that its not necessary to return to them YouTube videos all the time to know what a parameter does.

So here we have the General Parameters.

Spacing - Spacing defines the number of voxels that will fit within the fume fx simulation grid. A single voxel is represented by a square box at one of the corners of the ffx grid. A voxel is basically a volumetric pixel in three dimensions. Adjusting the spacing value varies the size of a voxel. Larger the value, larger the voxel. More the number of voxels in the ffx simulation grid, more will be the level of detail of the simulation. These are similar to pixels in an image. Larger the voxel lesser the resolution. Say i have a ffx sim grid of 20 x 20 x 20, with spacing of 1.0, it means there will be 20 voxels along the length, width and height. if i set spacing to 2, there will be 10 voxels along the sides of the grid, if the spacing is set to 0.5 there will be 40 voxels.
It will be noticed that more the voxels in the sim grid, more will be the memory utilized by the simulation. Also note that that the minimum number of voxels that can fit in a square ffx grid is 8. So if we have a grid of 20 x 20 x 20 the max spacing will be 2.5 i.e. (20 / 8). If grid size is 150 x 150 x 150 then the spacing is (150 / 8) = 18.75. If we have a grid with varying dimensions like 100 x 35 x 75 the spacing calculation will only consider the smallest value (35 / 8) = 4.375. So in general for a grid a x b x c if a = b = c, max Spacing = a / 8. If a != b != c then max Spacing = min(a,b,c) / 8.

Width, Length & Height - These are the dimensions of the fume fx simulation grid. All calculations happen within this grid. Internally the grid is composed of voxels controlled by the spacing setting above. Changing the grid dimensions require an inspection of the spacing setting to keep the resolution of the sim same to what it was before the grid was resized.

Adaptive Checkbox - During simulation a blue grid is often seen expanding along the dimensions of the fume fx simulation grid. This is the actual physical grid for which all computations are done. It limits computations only to its bounds instead of computing it for the entire ffx grid (which is the yellow bounding box). So if your simulation elements are active only within half region of the ffx grid the adaptive grid will compute only for half of the ffx grid. Keeps sims faster and keeps things efficient. By default its ON and should be kept that way. Also, it depends on what you are simulating. Keeps the cache files smaller in size and size varies as the sim progresses. If this setting is turned OFF, you will notice the sim takes more time as computations are performed for the entire grid and the cache files are all the same size. Not effiecient and a waste of time !!

Sensitivity - Eventually during course of the sim, the adaptive grid becomes the same size as that of the ffx grid. If the sensitivity value is increased it keeps the adaptive grid from expanding too much and keeps it tight around the simulation. It resizes dynamically as the simulation progresses and tries to be small as possible. The frame sizes in the cache files too becomes small and takes less time to simulate.


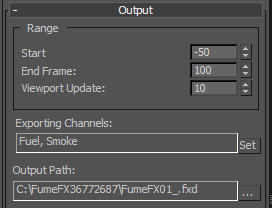
Range - The range section specifies the range of simulation i.e. the range of frames for which the simulation runs. By default its set to a start frame of 0 and end frame 100. So the sim runs from 0 to 100. As shown above we can offset the values of start frame depending on what we need. A negative setting of 50 means the sim runs from -50 to 100. Such that at frame 0 the flame will already be present if we render the frames 0 to 100 in 3ds max. If the enable viewport display has been enabled then the Viewport update setting determines the rate at which wth 3ds max viewport will update displaying the selected ffx channel. A setting of 10 will update the viewport after simulating 10 frames.

Exporting Channels -  Determines which simulation element is considered for calculations in the simulation.. By default Fuel and smoke are the exported channels. If smoke is de-selected from the Simulation Tab then Fuel is the the only exported channel. By selecting other parameters like Temperature we are doing a lot more computations for the sim and the cache file too holds a lot of information making the sim slower.

Output Path - This is the path where all the simulated frames are stored.


Playback Range - These are the after-simulation playback controls. The Play From field determines the start of playback. By defaukt its set to 0. If i set it to say 50. Then we will get a playback from frames 50 to 100 om the 3dsmax timeline. However it will be noticed that frames 50 to 100 are blank and 0 to 50 contain the sim. So what happened exactly ? With a Play From value of 50, frames 50 to 100 offset to frames 0 to 50 and 51 to 100 cleared out. (This does not mean the sim data was deleted out it still exists in the cached files). So setting a value in these boxes will only display the requested data from the cached files.

Start Frame specifies when to start displaying the simulation. So if its set to 50 and we play the entire range of 0 - 100, then frames 0-49 will appear blank.

The Out of Range Types specify how to mess around wih the selected range. This are practical settings and can be experimented upon. Say you want to loop over a given range of  a fire simulation. You will then set the start frame to your loop in frame and end frame to loop out frame and then set the after end to Cycle mode. This way your sim will loop within the set frames. Ping-pong will just reverse the frames for additional effects


So that's it for the General Tab. Hope it was informative and more tabs coming soon.
Questions / Suggestions Leave a comment.


Until next time....


Saturday, July 2, 2011

Alternate Reality EP3


Here is my latest composite. Shot near Samsung lakeView building with a Nokia N8 at 720p, an armada of Graf Zepplins in the sky with a mountaneous terrain in the background. None of which is in the original footage as shown below.


The workflow in brief is shown below.

1. Getting the stock images. In this case the mountains and zepplins. Using photoshop isolate the key elements to be composited into the shot. E.g. the removal of the zepplin from the original image as shown below.


2. Motion track the footage. To prevent the elements in the composite from slipping due to camera movement. Match moving estimates the camera motion and can be used to store the position and rotation intormation into a null object. After this any element linked to the null object moves with the camera.

3. The Rope. 3DS Max Reactor physics used to simulate a falling rope. A loft modifier applied to the simulated spline creates a rope like structure. Need not worry about its texture / appearance as its far away from the camera. However a suitable color is necessary to make it visible in front of the background.


4. The Sounds. Nothing fancy here. Open up the DAW, Play around till whatever sounds nice cos' this ain't a hollywood movie haters.!!! Toxic 3 and Sytrus used to generate the sound effects in FL.


5. Bring it all together with an assortment of track mattes, masks, adjustment layers and color grading and you're done.


Until next time...

Thursday, June 16, 2011

FaceBook Simplified

An infographic about our favourite site - FaceBook. There's everything for the plot - You, them, friends, fence, druglords, bad grammar and sets. Click to Enlarge.


Created using Wacom Bamboo©

Monday, June 6, 2011

Light Painting - Part 1

Light painting, also known as light drawing or light graffiti is a photographic technique in which exposures are made usually at night or in a darkened room by moving a hand-held light source or by moving the camera. In many cases the light source itself does not have to appear in the image. The term light painting also encompasses images lit from outside the frame with hand-held light sources.

Having read this i tried some of this stuff myself. Using the torch light from an old Nokia cellphone and darkness as the canvas i got some pretty interesting results. Shot using a Canon T2i at 30 second shutter exposure. Will be experimenting on this using different light sources and techniques. The red trails seen in the pictures are when my finger was between the light source and the camera. So basically its my blood shining through :-D

Here are a few pics of the same. If you zoom in closely you might just be able to see me.18 mega pixel photos at 4+ MB might take time to load. Click to enlarge.


Painting alphabetical characters is a real nasty job if you are a first timer at this. Had to do it a couple of times to get it right in the frame.

Getting cursive Eh ? That should be in the past tense actually :-D

Bringing the light source closer to a wall surface can yield completely different results as the light intensity diminishes as we move away from the source giving a soft feathered appearance at the edges.

Saturday, May 28, 2011

Waste of Time

A small GIF created using After Effects. Shot using a Canon Rebel T2i at 1/125th of shutter speed, F5.6 and 3200 ISO. 60 shots composited into a single animated GIF. A slight shift in frames can be observed as the camera got displaced infinitesimally while pressing the shutter button. The original GIF composite at 5184x3456 resolution turned out to be 340 MB. This is the scaled down version of the same. The loss of quality is evident. This takes time to load. In this case time is not flying :-P but seems to reset itself, stuck in an endless loop....


To improve quality a little bit i tried to shoot the images in raw and then resize them using the image processor feature of photoshop and composit them in after effects after a little correction to the exposure. Here is the result. A little more vibrant than before but still having a presence of a grainy noise.


To eliminate the noise that was visible a different approach needs to be followed. Most of the objects in the image are still with only the second hand moving. With the following steps the grainy pixel motion can be eliminated.


1. Create a layer above the animation sequence containing the first frame of the animation.
2. On top of this create a black solid and using the pen tool crop it to the radius of the watch.
3. The solid in [2] will act as an alpha inverted matte for the layer created in [1]. Hence set the track matte of layer one to Alpha inverted.
4. Render as GIF animation with web safe colors.

The output is below. Much improvement over the other two. Of course a very small displacement of the watch dial is visible due to camera shake while pressing the shutter release. Click to load (11 MB)


Wednesday, May 18, 2011

Trichromacy

A new vid for post 80 !!! A very tiny compilation of few of my travel videos; each segment of which displays independent channels - Reds, Blues and Greens making certain objects stand out from the surroundings using the color leave feature in AE. Shot at The Residence Inn Branchburg and Atlantic City New Jersey with a Canon Eos Rebel T2i, 18-55mm lens, 1080p, 24fps. Try watching in HD. Complaining already about a video that is too small ? Well this is the maximum processing my laptop could possibly handle with 1080p clips and 3 GB RAM. Took 15 minutes to render at max settings.


Wednesday, May 4, 2011

Week - 18

Nothing much to upload these days. Here are some samples created using Oxygen25 and XSession Pro. Preparations for some really cool stuff are underway. ETA 60 days :-D

A mix compilation of seven of the best remixes and productions by Omnia and The Blizzard. This is the first mix i've ever done using M-Audio XSession Pro and Virtual DJ. Here is the track list so you know what to expect.

1. Omnia & The Blizzard feat. Susanna - Closer
2. The Blizzard - Kalopsia
3. Omnia & The Blizzard - My Inner Island
4. Monogato - Miami Vibe (Omnia Remix)
5. The Blizzard with Gaate - Iselilja (Sunn Jellie & The Blizzard Dub Mix)
6. Markus Schulz feat. Ana Criado - Surreal (Omnia Remix)
7. Omnia & The Blizzard - Metanoia


And yet another composition using Oxygen25 live and FL. Something i started at Heathrow Intl. airport waiting 4hrs for a connecting flight. Yep it does get a little cranky at the end but here it is anyway :-D


Tuesday, April 5, 2011

Mathematics of Italics

One of me friends posted a status on his Facebook wall saying - "what do you get when you apply 'italics' to backslash ?" For a moment i thought he was kidding (he was actually....). I went out to seek the UN-explainable. So in the name of Euler's Identity here is the awe-inspiring discovery that was made.

The original text and the italicized text. Notice a change in angle of the backslash. (we knew this was gonna happen)

So now i was obsessed to find the angular difference between the two backslashes. To do that i overlapped a couple of lines over the backslash switching between the formatting. The green one is the italicized and red one is the normal. Black as usual represents the reference line at zero degrees.


Now all i need is a protractor to measure the angle. But unfortunately its not possible to find one in a place like this. Enter the power of imaging. Using some reference images of a protractor and a great online image editing program called Pixlr i got started. First capture the image via print screen and crop it to content. Create a new layer above the lines and paste into it the protractor image. Reduce layer opacity such that the lower layer is visible. Measure the angle just like old times !!

Angle of the normal backslash

Angle of the italicized backslash

With a few calculations the angular shift computes to approximately 10 degrees. So that's what you get for italicizing a backslash. Do all characters shift by the same angle ? Well i'll leave this one to be figured out by You !! Here is the Pixlr workspace at work...


Until next time...

Wednesday, March 23, 2011

Gearing Up

Snapshots of things to come. An attempt to create a small but powerful personal audio and video production hub. Starting with an M-Audio USB MIDI controller down below makes life much easier and flexible with my DAW.


Sunday, February 27, 2011

EOS Ground Zero

Finally got me some time to compose this post, the first post from a distant ghost town of Branchburg, United States of A. Well its been quite a bad weather since i got my Eos Rebel T2i. These pics are just some indoor experimentation with the camera and you can just consider this as a trailer of things to come. Shot with a 18-55 & 18-135 mm lens. Click to enlarge....i mean the pics...

Breakfast Area @ Residence Inn

Keyboard close ups


 A color correction tip - Taking flat pictures like the one below preserves all the data in the shadows & highlights and prevents the camera from deciding how to deal with the colors in the picture....

...then using photoshop the data can be stretched to give a much better flexibility at grading / correction than the one shot with the standard settings. Stretched this one too far..

Not exactly a Rolex, who cares..

...the photoshop version...

The cam at work

Until next time....

Monday, January 24, 2011

A FireFox Tip

This is a small Firefox tip that will come pretty handy. Say you have a lot of bookmarks, saved passwords, saved web page urls, lots of shortcuts in the Firefox window, installed extensions like StumbleUpon, UnPlug etc. This Firefox with all your surfing history is on your desktop system. You installed FireFox on your brand new laptop and now you want your laptop's FireFox to be configured exactly in the same way as your desktop. Now its pretty difficult to manually feed in the information to your new laptop. It could take hours (in my case days) and most of it is totally not transferrable. So, here is a way to get all the glamor from your desktop to your laptop with a few clicks a USB stick and no network connection.


1. Open the FireFox on your Desktop.
2. Click on Help -> Troubleshooting information.


3. This opens up another tabbed window displaying all the FireFox preferences and settings. Here under the Application Basics section, for the profile directory Click the Open Containing Folder button. If you observe the address bar you can see that this window can also be brought up by typing about:support in the address bar.

4. This will open an explorer window showing you the location where FireFox keeps all its important data. This information is the brains of FireFox. It will usually be found in C:\Documents and Settings\[username]\Application Data\Mozilla\Firefox\Profiles\[somecharacters].default directory.

5. Copy all the contents of this [somecharacters].default directory to your USB stick.

6. Open the FireFox on your laptop and this time open the support page by typing about:support in the address bar. 

7. Just like before click on Open Containing Folder to view the contents of that folder on your laptop.

8. As a safety means backup that data you see into a temporary folder somewhere else on your drive.

9. Shift + Delete the contents of that directory and Paste the contents of your USB Stick that you just copied from your desktop into this directory.

10. Close the window and restart FireFox.

11. If all the steps above were followed then bingo !! Your laptop's FireFox will be configured just like the FireFox on your desktop.

This technique can also be used to backup your entire FireFox in case of a new install or some other purpose..

Happy Surfing....

Sunday, January 23, 2011

Half - Life

This is a collection of three short films based on the Half-Life game series that i stumbled upon. Escape From City 17, What's In the Box and Beyond Black Mesa. All of 'em are totally awesome and a must see for any HL fan. For those who do not know what Half-life is, click here.


Escape From City 17


What's In The Box


Beyond Black Mesa


Almost makes me wish to make one of my own, now that i can handle a complete post production pipeline, but what's missing is a set of enthusiastic people ready to take on a challenge like this & most of 'em shy away from such stuff. Remember - The right man in the wrong place can make all the difference in the world..

End of Transmission...


Thursday, January 20, 2011

January Jamz...

Two of my releases for the month of January. Familiar & recognizable tunes crafted by randomizing parameters on various synths Sytrus, Toxic etc. Experimentation goes on and on... :-D

Evolution and Sands of Time (Part 1) created on Core i3 literally sucking it dry of CPU cycles. Currently working on Sands of Time Part 2, a better and improved industry standard version. But for now, enjoy the musik.


Evolution


Sands of Time


For more crazy stuff visit - http://www.youtube.com/user/Icarus708?feature=mhum
Until next sands of time.... :-D

Sunday, January 9, 2011

Matte Painting - EP2

Another episode of me matte painting out the sad area around Samsung building. I bet the bagmane developers did'nt see this coming :-D

So, the shot comprises of 3 elements - a replaced sky, a mosque from the city of Istanbul and the Chateau de Chillion, Lake Geneva in Switzerland to the left.

Here are the pics with the original shot. As always zooming in too much with Jedi like concentration could damage your brain cells....


[Original Shot]


[Final Matte]


Here is another version. Spot any differences ?


Find any problems with the images, blending problems, color correction etc. Leave a comment.

Lots more to come, once i finish my Photoshop, AfterEffects and 3DS Max training courses :-D
Until then....